With dentistry advancing in the digital age, we see many great new gadgets and software, making our work easier and more accurate. Intraoral scanners like iTero and Trios have become more popular in dental practices, giving us valuable images quickly.
In this tutorial, we demonstrate how you can use your iTero intraoral file in SmileStream's robust DentalCAD orthodontic modeling software. With a few minutes, you (or your staff) can create a workable, 1:1 double occlusal model image to trace in SmileStream, giving you important calculations to plan your orthodontic treatment.
Time: 3 minutes
You will need:
- iTero file
- MyCADENT account (free with iTero purchase)
- Snipping Tool (free on all PCs) or any screen capture software
- Microsoft Paint (free on all PCs) or any image editing software
- SmileStream account (free with Progressive Orthodontic Seminars training)
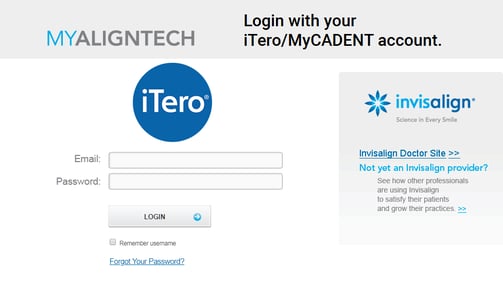
Step 1: Login to Your MyCADENT.com Account
Use your credentials and login provided by iTero.
Step 2: Access Your Patient’s Model Records
After logging into your account, you should see your list of completed/trimmed 3-D models, with their order number. Click the order ID of the patient you wish to open.
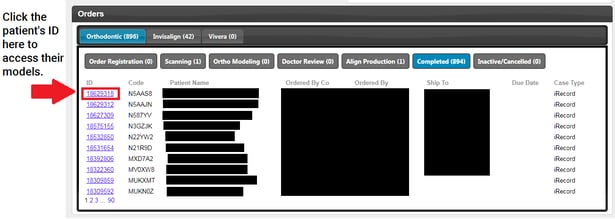
(The names of patients and doctors in this example have been censored, to comply with HIPAA.)
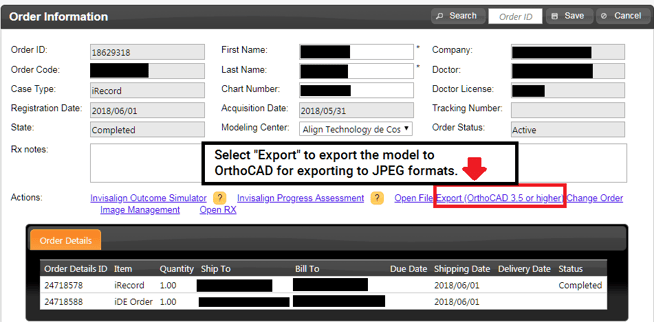
Once you open the patient, you will see a link named “Export (OrthoCAD 3.5 or higher)”. Click this link to open the models in OrthoCAD.
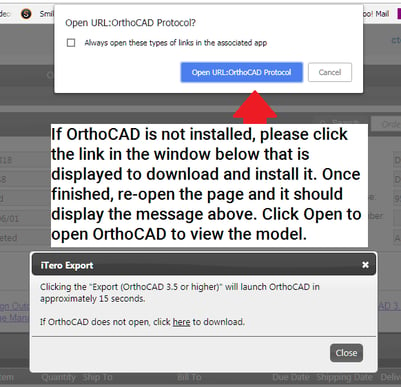
Step 3: Export All Model Views from OrthoCAD to JPEG
The following prompts will appear. If OrthoCAD is not already installed, please click the “click here to download” link in the iTero Export prompt in the middle of your screen. Once it is installed, click the Export link again, and the top prompt will appear. Click Open, and OrthoCAD will open the patient’s model file.
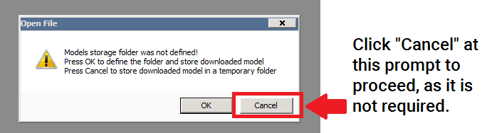
Once OrthoCAD is open, it will display the following message below. Click cancel, and it will proceed as normal, it is not required to complete this configuration.
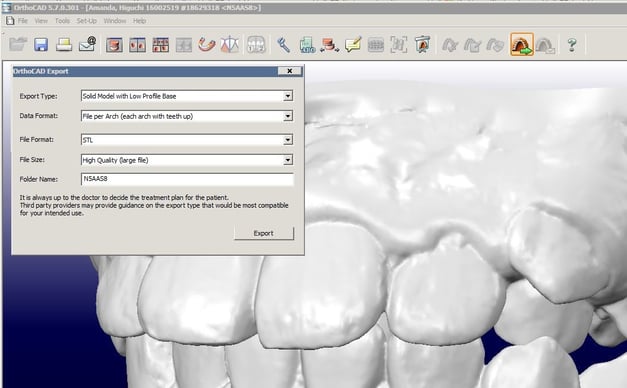
The “Export” dialog should appear automatically. Set the Export settings to what is pictured below and click the Export button to finish exporting the models to JPEG format.
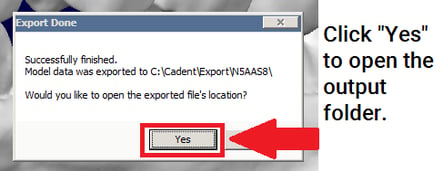
Once the image is finished processing, the message below will appear. Click Yes to proceed to show the models in the folder they were exported to. All views of the patient’s teeth (such as closed-bite side views) have been exported to this folder, for use in the Picture Tab of your patient. However, we still need to create a double occlusal view specifically for DentalCAD (covered in the next step).
Step 4: Create a Double Occlusal View of Your Models with Line Measure
Return to the OrthoCAD window and press the Occlusal View button.
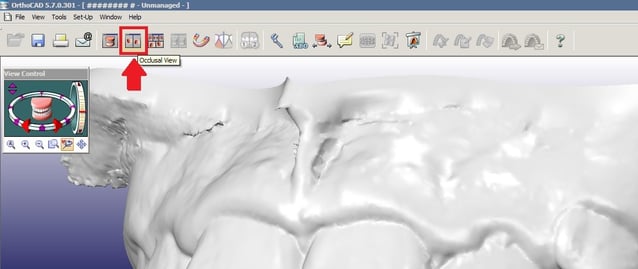
The jaws will appear in double occlusal view.
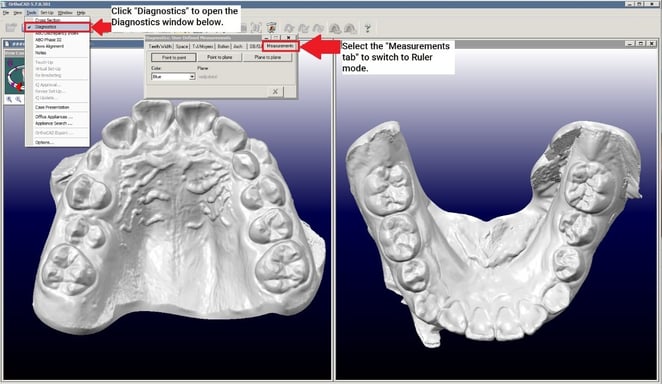
Next, we will be placing a measurement on our double occlusal model to later verify they are 1:1 ratio. Click the Tools menu, then select Diagnostics. The diagnostics window will appear. Click the Measurements tab to switch to ruler mode.
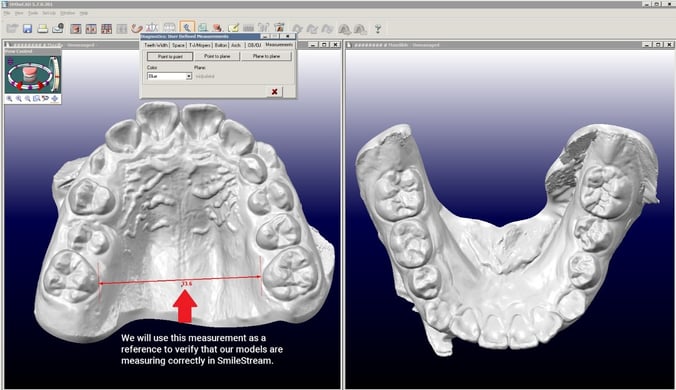
Similar to SmileStream’s own ruler tool, place your first point by clicking a location on the teeth that is easy to line up, I have chosen the edge of the 1st molar. Then, place a second point directly across from this point, and a measurement will appear.
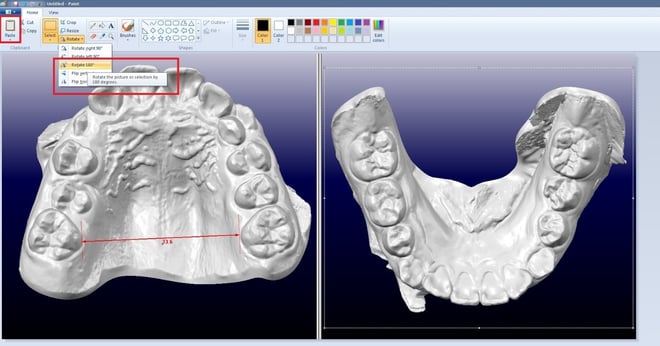
Step 5: Fix Orientation of Models
In this case, our Mandible is upside-down. We will need to flip it upright. To do this we need to use the Snipping Tool to move the image to Microsoft Paint to adjust and save into the right orientation. Here's how to do this:
Open Snipping Tool, move any windows out of the way of the models and press New, then highlight the entire model area so it shows up as pictured below. Then, press Copy to copy it to your clipboard.

Open Microsoft Paint, then press Paste. The model image we copied will appear. Use the Select tool to highlight the mandible, then rotate it by pressing Rotate -> Rotate 180°.
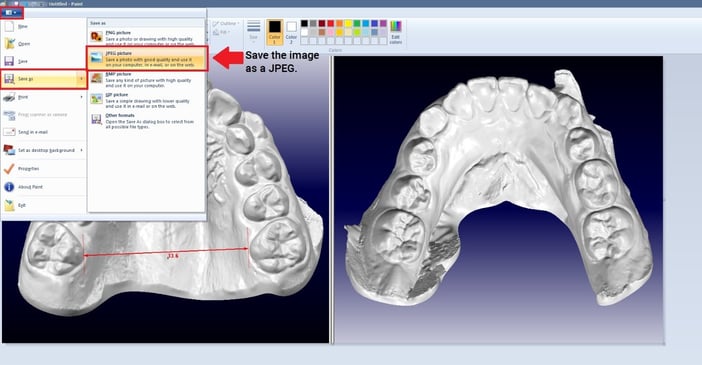
The mandible will rotate upright as shown below. Save the image as a JPEG. We now have a JPEG copy of our patient’s models in double occlusal representation, with a reference scale, saved on the computer.
Step 6: Calibrate Image to 1:1 Measurements in SmileStream
Once the image is saved, upload it as your patient’s Model in SmileStream’s DentalCAD, then select the Ruler Tool. Just like we did in OrthoCAD, place a point directly at the end of each arrow on our reference scale line to measure it.
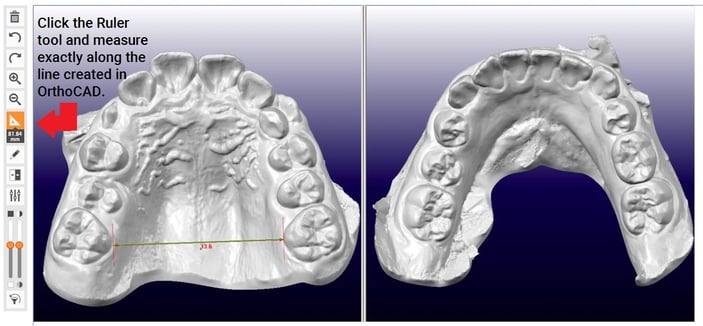
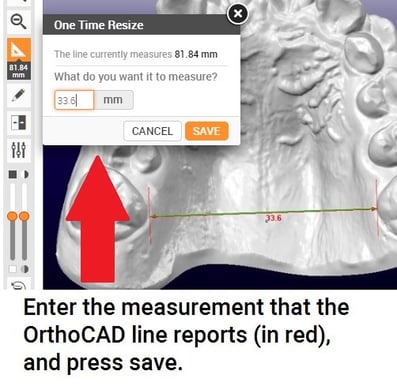
SmileStream is displaying an incorrect number; we will recalibrate the length of the measurement so our images will be to-scale. Click the number, in this case 81.84mm, then select One Time Resize.

A prompt will appear where we can enter the correct number. Enter the number that our reference line was reporting, in this case 33.6mm, and click Save.
Our models have now been calibrated to match the measurements provided by our 3-D model. Drop an archwire onto the model, and it should line up with the teeth.
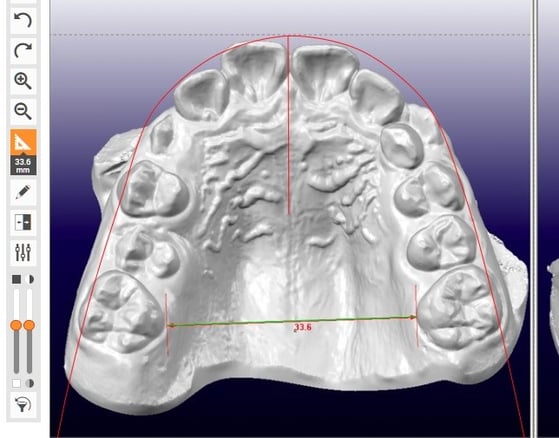
Your models are now compatible with SmileStream!
If you require more help, please email support@posortho.net and we will assist you further.
